
If someone asked you right now which marketing channel brought in your last ten signups, could you answer in under a minute? For most SaaS teams, the honest answer is no. Not because the data doesn't exist somewhere, but because nobody set up the tracking to actually capture it.
That's what this guide is for. I'm going to explain what GA4 and Google Tag Manager actually are, why they're usually used together, and then walk through setting up real conversion tracking for a SaaS product from a completely blank slate. No prior experience needed.
What GA4 and Google Tag Manager actually do
Let's start with the basics, because a lot of guides skip this part and it makes everything after it confusing.
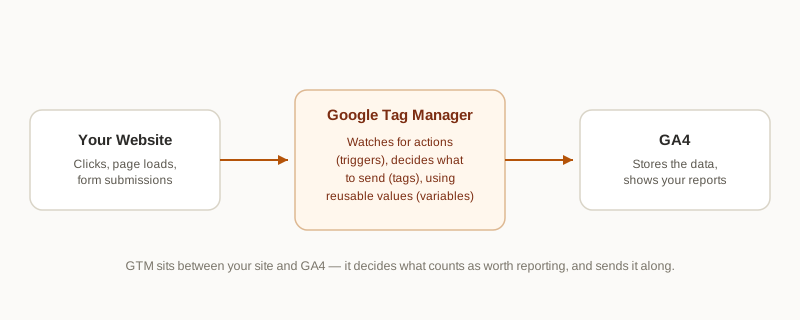
GA4 (Google Analytics 4) is where your data lives and where you look at reports. It's the tool that tells you how many people visited your site, where they came from, and what they did once they got there. Think of it as the dashboard.

Google Tag Manager (GTM) is a separate tool that decides what information gets sent to GA4 in the first place. On its own, GA4 only knows about pageviews. It doesn't automatically know that someone clicked your "Start Free Trial" button or filled out your signup form. GTM is what watches for those specific actions on your website and tells GA4 that something worth recording just happened.
Here's an analogy that might help. If GA4 is a filing cabinet full of reports, GTM is the assistant standing at your front door deciding which visitors are worth writing a note about, and what that note should say. You don't want a note for every single person who walks by. You want notes for the ones who actually did something meaningful, like signing up or starting a trial.
The reason marketers like using GTM instead of asking a developer to add tracking code every time is that once it's set up, you can add or change what's being tracked yourself, through a simple visual interface, without touching the website's actual code.
Before you start: get your GA4 account set up properly
Before we touch Tag Manager, you need a GA4 property to send data to. If you already have one, it's worth checking that these are configured correctly, since a couple of them are much harder to fix after the fact once historical data has already piled up under the wrong settings.
Decide how many properties you need. If you have a marketing website and a separate app, like app.yourproduct.com, you'll usually want them combined so you can follow a visitor's journey from your homepage all the way into the product, rather than losing them the moment they cross over to a different subdomain. This is called cross-domain tracking, and it's much easier to set up correctly at the start than to untangle later.
Change your data retention setting. By default, Google only keeps your detailed, event-level data for two months before it starts deleting it. Go to Admin, then Data Settings, then Data Retention, and change it to 14 months. Otherwise, six months from now, you won't be able to compare this quarter to the same quarter last year, because the older data will simply be gone.
Turn on Google Signals, if it makes sense for your audience. This one confuses a lot of people, so it's worth slowing down on. Normally, GA4 can only track someone within a single browser session using cookies. It has no idea that the person browsing on their phone this morning is the same person who visited from their laptop last night. Google Signals changes that, but only for visitors who are signed into their Google account and have "ads personalization" turned on in their own Google settings. For those users, Google can quietly connect the dots across devices and also add demographic detail, like general age range and interests, that GA4 otherwise wouldn't have. Turning this on unlocks a few extra reports (cross-device reports and demographic breakdowns), but it's optional, and if your audience is in a region with strict privacy expectations, it's worth reading Google's consent requirements before flipping it on. Nothing else in this guide depends on it, so feel free to skip it and come back later.
Exclude your own team's traffic. This one's genuinely important, because without it, every time someone on your team checks the live site, tests a form, or clicks around while debugging something, it counts as a real visitor in your reports. Over a few months, that quietly inflates your numbers and makes your conversion rate look worse than it really is, since your team is visiting constantly but rarely "converting." Here's how to fix it:
- In GA4, go to Admin, then under your data stream, click into the stream and find "Configure tag settings," then "Show more," then "Define internal traffic rules." Here you'll tell GA4 to label any traffic coming from your office or home IP address as internal. If your team works from a few different places, you can add a rule for each IP address.
- This step alone doesn't remove that traffic from your reports, it only labels it. So there's a second step: go to Admin, then Data Settings, then Data Filters, and create a filter that excludes traffic labeled as internal. You can leave this in "testing" mode for a few days to confirm it's catching the right traffic before switching it to fully active.
It's a two-step process because Google wants you to be able to test the labeling before you start throwing data away, which is a sensible safeguard, even if it means an extra click the first time.
Setting up Google Tag Manager
Now for GTM itself.
- Go to tagmanager.google.com and create a new container for your website. GTM will give you two small pieces of code.
- Add both pieces of code to your website: one goes near the top of the page, in the head section, and the other goes right after the opening body tag. If you're using a website builder or CMS, there's usually a dedicated spot to paste these without touching raw code. If a developer manages your site, this is a quick, one-time ask, not an ongoing dependency.
- Inside GTM, you'll create your first tag, which is really just an instruction that says "send this piece of information to GA4." Create a GA4 Configuration tag, paste in your GA4 Measurement ID (you'll find this in your GA4 property settings, it looks like G-XXXXXXX), and set it to fire on all pages.
- Publish this container, then check your GA4 property's Realtime report. If you see your own visit show up, the basic connection is working.
The three building blocks of GTM: tags, triggers, and variables
Before building anything more advanced, it helps to actually understand the three pieces you'll be combining, because everything in GTM is just some mix of these.
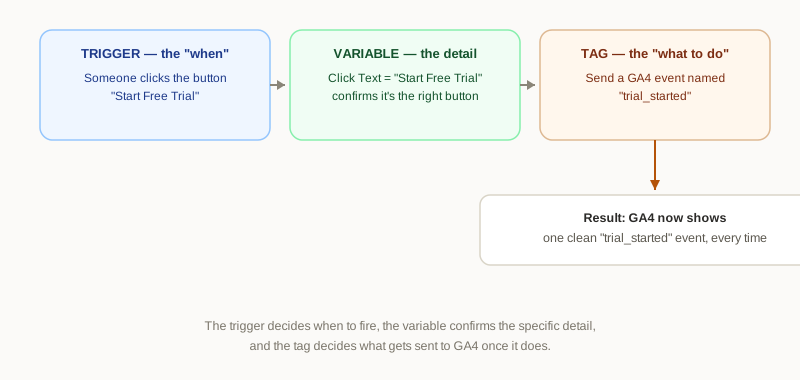
Tags are the "what to do." A tag is an action, like "send an event to GA4" or "fire the Meta Pixel." Every tag needs something to tell it when to actually fire, which is where triggers come in.
Triggers are the "when to do it." A trigger is a condition, like "when someone clicks a button with the text Start Free Trial" or "when someone lands on a page whose URL contains /signup/success." A trigger by itself doesn't send any data anywhere. It just watches for something to happen and then tells its attached tag to go ahead and fire.
Variables are the small, reusable pieces of information that both tags and triggers lean on. Instead of typing the same value over and over, you store it once as a variable and reference it wherever it's needed. GTM comes with a bunch of these built in already, like the current Page URL, the Click Text of whatever was just clicked, or the Click ID, and you can also create your own custom ones. This matters more than it sounds like, because variables are what let a single trigger stay flexible. For example, rather than building a separate trigger for every single button on your site, you might build one trigger that watches for clicks on any button, then use a Click Text variable to check whether the text matches what you're looking for.
Once you can picture tags, triggers, and variables working together, like a trigger watching for a condition, a variable feeding it the specific detail it needs to check, and a tag firing once that condition is met, the rest of GTM starts to feel a lot less like a black box.
A quick note on Google Ads and Meta conversions
This guide is focused on GA4, but it's worth knowing that the same trigger you build for a GA4 event can usually power your ad platforms too, without much extra work. Once you have a trigger set up for something like "signup completed," you can add a second and third tag to that same trigger: a Google Ads Conversion Tracking tag and a Meta Pixel event tag, both available as ready-made tag types inside GTM. This means one real action on your site, like a completed signup, can simultaneously tell GA4 a conversion happened, tell Google Ads to optimize toward more people like this one, and tell Meta the same thing, all from the same trigger you already built. You're not building three separate tracking systems, you're reusing the same "when" and just adding more "what to do next."
Deciding what actually counts as a conversion
This is the step people rush through, and it's the one that matters most. Don't try to track every click on your site. Focus on the handful of actions that actually represent business value. For most SaaS products, that short list usually looks like this:
- Someone requests a demo or starts a free trial
- Someone completes signup
- A trial user upgrades to a paid plan
- Someone completes the specific action inside your product that tends to predict whether they'll stick around, sometimes called an activation event, things like creating their first project or inviting a teammate
For each one, it helps to ask: does this happen on its own page, like a "thank you" or "welcome" page you can track just by its URL? Is it a button someone clicks? Or is it something that happens entirely inside the product, after someone's already logged in? The first two, page visits and button clicks, can be set up entirely inside GTM, using the trigger and variable building blocks we just covered, with no coding involved. The third one, something happening inside your actual product, works a little differently, which is worth explaining properly.
Why some events need a bit of engineering help
Here's the part that trips people up. GTM, in its standard setup, can only see things happening in the browser on your public-facing pages, things like a click, a page load, or a form being submitted. It has no built-in way of knowing that, deep inside your logged-in product, a user just invited a teammate or created their first project. That action isn't a click on an element GTM can point to, it's a piece of business logic happening inside your app's own code.
So for these in-app events, someone on your engineering team needs to add a small line of code that essentially announces the event, something like dataLayer.push({event: 'teammate_invited'}), at the exact moment that action happens in the app. This is called pushing to the dataLayer, and it's the bridge between "something happened in our product" and "GTM can now see it."
Here's the good news, and it directly answers a question worth asking: once that line of code is in place, is that it, or does marketing need to keep going back to engineering? Once the dataLayer push exists, that's genuinely it for that event. From that point on, you can build a Custom Event trigger in GTM that listens for exactly that push, and if the developer included any extra detail in it, like which plan the teammate was invited to, you can pull that out using a Data Layer Variable and attach it to your GA4 event. No further code changes are needed unless you want to track a brand new action that hasn't been wired up yet. In practice, this usually means one short conversation with a developer per new type of in-app event, not an ongoing back-and-forth every time marketing wants to adjust or expand what's being tracked.
Building your first real tracking setup, step by step
Let's make this concrete by walking through one full example: tracking every time someone completes your signup form. This is usually the first thing worth setting up, since everything else tends to build on it.
Say your signup flow redirects people to a confirmation page once they've finished, something like yoursite.com/signup/success. That URL only loads when someone has genuinely completed the form, which makes it a reliable, easy signal to build around.
Start with the trigger. In GTM, create a new trigger, choose the type "Page View," and set the condition so it only fires when the Page URL contains /signup/success. This is your "when": whenever someone lands on this exact page, GTM should pay attention.
Next, build the tag. Create a new tag, choose GA4 Event as the type, and connect it to the GA4 Configuration tag you already set up earlier, so GTM knows which property to send this to. Give the event a clear name, something like sign_up, and if you want to capture extra detail, like which plan someone chose, you can add that as a parameter here, pulling the value in from a variable if it's available on the page.
Now attach the trigger you just built to this tag. This is the step that connects your "when" to your "what to do," and it's easy to accidentally skip since GTM won't stop you from saving a tag with no trigger attached, it just won't ever fire.
Before publishing anything, click Preview at the top of GTM. This opens a side-by-side view of your actual website alongside a live feed of everything GTM is doing behind the scenes. Walk through your own signup flow exactly like a new visitor would, and watch the Preview panel to confirm your sign_up tag actually fires on the confirmation page, and importantly, that it doesn't fire anywhere else. This step catches the vast majority of mistakes, like a trigger condition that's slightly too broad and ends up firing on unrelated pages too. Only once you're confident it's behaving correctly should you hit Submit and publish the container live.
That's the entire pattern, and it's worth repeating: a trigger to define when something counts, a tag to define what to send when it does, and Preview mode to confirm you got both right before it goes live. Every other event you track later, whether it's a button click, a form fill, or an in-app action wired up through the dataLayer, follows this same basic shape.
Connecting the dots after data starts flowing in
Once your events are showing up in GA4, there are a few final steps that turn raw data into something you can actually act on.
In GA4, go to Admin, then Events, and mark each meaningful event, like signup, trial start, or upgrade, as a conversion. This single toggle is what makes them show up properly in your main conversion reports, rather than sitting quietly in the general events list where they're easy to overlook.
Connect Google Search Console to your GA4 property so you can see not just which search terms bring people to your site, but which of those searches actually lead to signups, which is usually a very different list than your highest-traffic keywords.
If you're running paid ads, import these same GA4 conversions into Google Ads or Meta so those platforms can optimize your campaigns toward people who actually sign up, rather than just people who click, which tends to lower your cost per real customer over time.

A few mistakes worth avoiding
A handful of things trip people up consistently when they're setting this up for the first time, and they're worth knowing in advance.
It's tempting to track everything. Every click, every scroll, every hover feels like it might be useful someday. In practice, this just buries the handful of numbers that actually matter under a pile of noise nobody ends up looking at. It's almost always better to start narrow and add more later, once you know what questions you're actually trying to answer.
It's also easy to only test on desktop, since that's usually what you're sitting at while building this. But a button or form that tracks perfectly on your laptop can quietly fail on mobile if the page layout shifts at smaller screen sizes, so it's worth walking through Preview mode on your phone too, not just your computer.
Messy campaign links are another quiet source of bad data. No amount of careful tracking setup fixes inconsistent UTM parameters on your marketing links. If "Facebook," "facebook," and "fb" all show up as separate sources in your reports because different people tagged links differently, that's a naming discipline problem, not a tracking problem, and it's worth agreeing on a simple standard before you need to compare channels side by side.
And finally, it's easy to treat this whole setup as a one-time task you finish and forget. Whenever your site's design changes, especially anything touching your signup flow or page URLs, it's worth double-checking that your triggers still match. A routine redesign can quietly break tracking that used to work perfectly fine, and the first sign is usually a strange, unexplained dip in your reports weeks later.
Where this leaves you
None of this requires a technical background, and that's really the point of GTM existing in the first place. It was built specifically so that marketers could own this kind of setup without leaning on engineering for every small change. The part that actually takes thought isn't the software itself, it's deciding early on which handful of actions genuinely represent someone becoming a real customer, and building your tracking carefully around those, rather than trying to capture everything at once and sorting it out later.
If you're setting this up for the first time, don't feel like you need to build the whole thing in one sitting. Start with just one event, like the signup example above, get it working end to end, and confirm it in Preview mode before you publish. Once you've done that once, every event after it follows the same pattern, and it stops feeling unfamiliar fairly quickly.
Want help setting this up?
I build measurement setups like this for marketing teams. Happy to talk it through.